Engel![]() Bee
Bee
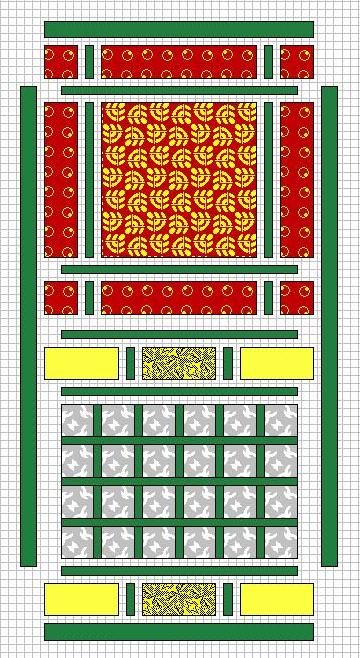
Inchie Adventcalendar
|
|
|
|
|
Material needed: |
|
|
A) 10 inch Panel or fussy cut Motif |
|
B) 4 Squares - 2,5 inch, 4 rectangles - 2,5 x 10 inch |
|
|
C) 6 rectangles - 2,5 x 5 inch |
|
|
D) 6 strips - 2,5 x 11 inch |
|
|
E) a lot of 1 inch strips for sashing and 1,5 inch for framing |
|
|
Finished Size: 17 x 32 inch |
|
|
|
|
|
# Press seam always into the sashing, except other advise is given. |
|
|
Sew a 1" strip to the left and right side of the panel. Add two B rectangles to both sides. Sew a 1" strip to top and bottom. |
|
|
|
|
|
|
Make a row from 1 square B, 1strip, 1 rectangle B, 1 strip, 1 square B; repeat for another row. Press same direction as panel. Sew these rows to top and bottom of the panel unit. Add a 1" strip to the bottom edge. |
|
|
|
|
|
Make a strata with the 11" rectangles, setting 1" strips between along the long side. Cut the strata in four 2,5" strips. Set again sashing between and to top and bottom. |
|
|
|
|
|
Make 2 rows, each by using three 5" rectangles C, again with a sashing between. Sew one row between the panel unit and the Inchie grid. The other row add to the bottom. |
|
|
|
|
|
Measure the length of the top, cut the 1,5" strips to size and sew them to both sides. Press. Measure now the width of the top, cut the 1,5" strips to size and sew them to top and bottom. Press. |
|
|
|
|
Sandwich the top with back and batting and machine quilt in the ditch. Add the binding. |
|
|
Embellish to your hearts desire. |
|
|
Add any kind of hanging. |
|
|
|
|
|
|
To hang the Inchies in place, sew a hook on top of each square and the eye on the back of the Inchie, so the eye is over the top edge. |
|
|
|
|
|
Enjoy and feed your Advent Calendar for 24 days. - A 25th Inchie can be added in the center of the last row (center rectangle). |
|
|
The center rectangle between panel and calender is thought to add an exchangeable label with the year. |
|
|
|
|
|
|
![]()